rasputin
-
Posts
24 -
Joined
-
Last visited
-
Days Won
2
Content Type
Profiles
Forums
Events
Everything posted by rasputin
-
Maybe just glue a smaller belt or o-ring to it? I got the Mibenco right here, plus it's probably the most simple to use. But I'd need to establish a little test setup to really tell about "before" and "after". r
-
No. I've been thinking about painting it with "liquid rubber" (Mibenco or PlastiDip), but never tried. r
-
Actually, the "rubberband mod" is a cargo cult. The only thing it does is to alter the belt's gearing ratio. What we perceive as "lack of torque" is actually the belt slipping at the motor pulley. Whatever You do to the platter pulley won't improve anything. r
-
I have added a spring to a PT01 cutter a while ago. It basically does what You describe. https://www.youtube.com/watch?v=62qH7_zEKYA r
-
I spent hours and hours looking at Your circuit diagramm in the past year, until my eyes were bleeding. I cannot tell how much I appreciate that You had posted it. I had also collected the data sheets to all major components, therefor I recognize the first picture that You now posted. What I was referring to with my "seesaw" comment is the 33 section in the top-left corner of Your circuit picture. If I set the switch to 45 or 78, that 33 circuit is still connected. Could You explain the reason or intention behind that? r
-
I have built two quite different PT01 in the past few months... PT01 "Righthand": (tonearm swapped with fader (Innofader Mini), the large white knob above the fader is the start/stop button, honeycomb platter) ...and the "LoFa Late Night": (all rotary knobs replaced with linear pots, honeycomb platter) For the "LoFa", I used a PWM module that has proven to work well, and added a pot/resistor circuit to it that enables to set 33 or 45, and a ± pitch. As a spin-off, I designed some "addon" solutions for the PT01 (or others). The linear version can be installed without soldering or drilling (cable is fed into the module through the old "pitch" opening): Is that the reason for that "seesaw"-style circuit? It appears that the "33" circuit is always connected, serving as a reference or feedback circuit? I tried to explore the secrets of the PT01 motor controller with an "experimental" board I made. But I totally suck at electronics... To me it appears that the craze is already over... r
-
I'd like to share my very own idea of "the perfect portable": http://www.bilder-upload.eu/upload/641447-1506969503.jpg http://www.bilder-upload.eu/upload/bcc1ee-1506969607.jpg http://www.bilder-upload.eu/upload/74cf16-1506970125.jpg - Custom-made 3D-printed platter - Custom-made tonearm, adjustable counterweight - Modified Shure M44-7 cartridge - Phono-preamp (Av:Link STP-2) - Phono buttons (red, from top to bottom): Gain, Speed (relocated stock knob), Pitch, Start/Stop (modified Sanwa) - Custom made fader box (can house JDDX2RS or Innofader) - Raspberry Pi, AudioInjector soundcard, 5" touch display, plus PiDeck software => DVS inside - Button to switch between "phono" and "DVS" mode - USB port for MP3 files on a USB stick - Line-Out (Cinch & 3.5mm) - Relocated speaker position, high-quality 2" fullrange driver (Monacor SPX-21M) - Dedicated vented cabinet (~0.4 litres, tuned to 110 Hz), vent exits at the turntable's bottom to boost bass - 6W aplifier (Kemo M033N), power/volume knob - Headphone amplifier (M-Audio Bass Traveller) - Line-In - 5V 10Ah powerbank (Fontastic "Eta"), powers the DVS system and headphones amp, plus - 9V Step-Up power regulator to power the PT01 circuit boards It was all wired up and working before disassembling and preparing the parts for the "final build". So it's not 100% finished yet, i.e. cover plate, front/rear panels and faderbox cover plates are still missing,.. r
-
Suprême NTM (France) r
-
I am more than happy about having finished some ideas that have been bugging my mind since a while. I never liked that "tone" knob, so I decided to "put it to rest", and move the "speed selector" to that place. The less buttons, the better. All the board's parts are actually still in place, however the "tone" potentiometer's lever was chopped, and the "speed selector" was heavily chopped/modified. The rest is done through a few 3d-printed parts, including new buttons for volume/pitch. Same applies to the Start/Stop button "flush" install, which is a modified Sanwa button with 3d-printed FLAT cap (on the quality caps like Sanwa, You can take the cap off). I never liked the arcade buttons' round top. It's not all finished yet, just a dry-build. There's some more parts I made, the platter and the headshell, but I have elaborated on these more than enough in previous posts... I had intended to cover the whole thing with a decal in the end, but the more I actually worked on it, the more I liked the idea to keep it look "stock, with an unflashy twist" (even though I like that "rough" or "used" look of the Start/Stop, I believe it needs a final paint job). Little video, showing the functionality (and some really horrible scratch skills): https://www.youtube.com/watch?v=cKIp27xqcMg Longer version which also shows how You can install a platter within seconds (grab the ring from the top, not from the bottom): https://www.youtube.com/watch?v=gUvfgNJ0Avo Ah, so one controls voltage, and the other one currency? I finally understood why there are 2 switches visible in Your circuit diagramm (which I'm extremely thankful for). r
-
A few questions that arose from looking at the "audio" circuit board: - The speed selector is actually two 3-position buttons in one (parallel). Why is that? - The "tone" poetntiometer is stereo. But it seems that they only use one channel? - Same for the "volume" potentiometer? r
-
If it's just about "listening to music", why do You want to modify the tonearm? The tonearm is well made and ideally suited for hifi purposes. Switching to a better cartridge is like opening Pandora's box: You need the cartridge, a new tonearm, and a phono preamp. r
-
I found out by accident that You can also use Your 7" Serato instead of the test record... r edit: I have just seen that I finally found an ally in platter reinforcement... I haven't done a lot here since I built my own platter, but what I have learnt from my tests is that the reinforcement part must not put stress on the platter. Most platters are out-of-rund laterally, if You try to "cure" that with a reinforcement part, the platter will distort. Therefor it's advisable to leave slight gaps between platter and reinforcement part, and then fill the gaps with glue.
-
Been working on a couple of ideas... https://www.youtube.com/watch?v=62qH7_zEKYA r
-
No, that's the actual belt dimensions. (I had entered the PT01 dimensions into the calculation tool, sent him a screnshot of that, he proposed two belts, I bought and tried both, and what You see above is the belt that worked better) r
-
"Rubber band belt" or "flat belt". I still don't like the stock cartridge at all, but this idea had too much potential to remain unexplored (2.6 gramms on the needle, like stock) r Edit: I designed a little tonearm holder for the PT01. You can download the file here: https://www.youmagine.com/designs/numark-pt01-tonearm-holder
-
I bought mine from http://www.die-radiowerkstatt.de/riemen.html (also bought one in a slightly different size, but the one I described above works best) You can surely find a dealer in Your area (or on ebay). I did. It's all parts or machines made for tinkering. Generally, anything that cannot machine steel, and even has a hard time with aluminum, is a toy. Anyway, I'm working on another PT01 tonearm modification, this time for the stock cartridge. I have measured the weight onto the stylus to be ~2.6 gramms, and I'm wondering how much I should target for. I've seen that the majority puts a coin onto the tonearm, but a coin easily weighs 3-4 gramms, meaning that people use ~6 gramms total. That's a lot, almost turns that cheap stylus into a box cutter. Any hints about a reasonable force to use? r
-
These parts are used in aeroplanes and helicopters and heavy machinery, but I totally understand that they aren't "good enough" for a DIY toy router ;-) It's one thing to say "a part does not last". Common explanations are "wrong part choice", "wrong usage", and "overload". But let's blame it all on somebody else, and to take it one step further, let's claim that "they" did that on purpose, because they follow a hidden agenda". That guy's bullshitting, as defined by Harry Frankfurt. Anyway, You are right about the rather low forces in a turntable, so they'll surely do a great job there. d =94 mm h = 5 mm s = 0.45 mm Available through audio equipment spare parts dealers. r
-
Sounds like a conspiracy theory to me. igus' main customers are industrial companies (automotive, food/medicine, etc.) who buy thousands or millions of parts per year, and the industry's quite simple: If Your products don't last, they'll buy elsewhere. I'm a huge fan of the "maker" movement, but sometimes they just exagerate and escalate... r
-
I don't fully understand (English is not my native tongue)... with "obsolescency", do You mean "outdated", or "built to wear faster, so You can sell more replacement parts", or...? Bytheway, the "iglidur" bearings in my videos are rotational bearings, not linear bearings like the "DryLin" in Your video. r
-
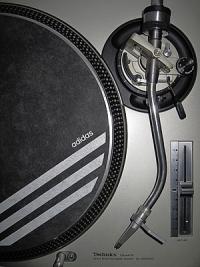
I found 'em. They're called "Dr. Suzuki" slipmats. I love it. r
-
Speeded up curing by tempering the whole thing at 40°. It turned out perfectly flat, and more concentric than I had expected. 93 gramms heavy, only 10 more than the stock platter. It's amazingly stiff, and worked very well in a short first test. I don't like printing in black colour (because any sanding/filing will be visible, and You almost always need to), but ran out of grey. This makes the platter's top even more "realistic", even when on that platter, it's numerous concentric circles, not one huge spiral like on a record. The honeycomb pattern is a total "engineering overdose" (printing the whole platter took 24 hours), but whatever... This platter does not have any dedicated "bearing". I tried to find some, but Numark are using a non-standard diameter... I considered using a standard dimension bearing and then re-bore it, but in the end just gave it a try like this. PLA is not a very durable material, but has a surprisingly low friction coefficient if a bit of oil is used (for the video, no oil was used yet). A serious turntablist might wreck it in hours or days for sure, but for some easy scratching and further research, it's perfect. The central area is reset by 0.2 mm. I intended to "compensate" for the sticker and/or thickness change on many 7" records. I'd like to have the record resting only on the "sound area". Otherwise, one'd be always "wobble" any record around its center area. On 12" records, the relations are different, so this does not matter. But for 7" records, it's obvious. Put the slipmat onto a table or floor, put a 7" concentrically onto it, and then press Your finger onto the one side and watch the other side (where the stylus would be)... they all move quite remarkably. Of course, that stock slipmat does not really help here (haven't seen any aftermarket slipmats unfortunately), but it'll always "be there". So far, it makes no difference. Maybe I should have gone deeper or larger diameter a bit... Actually, the recess in the platter is only "fiddling with a symptom". This recess should be in the slipmat, that's where the "problem" originates. Furthermore, there should be another recess at the very center, "compensating" for 7" adapters. So that those oldschool ones that are permanently clamped don't stick out, but also to have any adapter "puck" underrun the record by a half-millimeter or so, which would highly improve reliability (the stock one is terrible, bytheway). Has anyone ever picked up the idea of making such "profiled slipmats" or the like? Someone please make one for me (I'd even provide the data) This platter is ~1.5mm higher and 4mm larger than the stock one. Increasing height worsens the lever arm (of scratcher's fingers to tonearm bearing) and center of gravity, therefor it's only higher because I wanted it to be larger. I tried to make the platter "visible", like on a 1200, but unfortunately there's not much room to do so. I also had to print a new headshell to compensate for the height difference. r edit: I improved the shape of where the rubber belt runs, too...
-
I don't understand... no, not at all... to me, it was "technical question, technical answer". I had intended to add one or two sentences, going into detail, but usually, even when I try to keep it short, it just escalates into loooong pamphlets... so here's the long version: The PT01 platter's "flutter" starts in one particular place at the center. Mechanically, a turntable platter is "a disc, connected to a bearing". In this case, particular case, the "bearing" is a tubular bronze piece. In terms of stiffness, the bearing's OK, and the disc would be OK, too. But they messed up the connection between those two. With aluminum, this would have been an excellent and rugged solution. But with plastics, You just can't do like they did. You need reinforecment ribs, use all three dimensions, to shape a stiff part. "Stiffness" is not to be confused with "strength", bytheway. I don't expect a PT01 to feel like my 1200, but it hurts to see that the platter could have been so much stronger from the beginning, if just one knowledgeable and caring person would have had a look... they did make some little reinforcement ribs in the "2nd circle", but not in the very center where it's dearly necessary. (it wouldn't even be a problem to retrofit that to their existing tools, would probably only cost $2.000) Long story short: Reinforce and stiffen that particular area, and You cured the problem. It is surely not the only solution, and definitely not the cheapest solution. But it's the most natural approach, and in terms of "design quality" it definitely is the best approach. "Platter bars" surely do their job for scratching, but it's safe to say that in any case (even with Teflon), the unamplified audio signal will not benefit from knocking and rubbing plastic onto plastic. If I had to choose, I would want to avoid that, just because. That obvious "weak spot" had caught my attention, and the fact that I own a 3D printer came handy, of course ;-) The funny thing is that the platter is in fact a lot stiffer now, but the turntable as a whole is not. Needle skipping was not a huge problem before, mostly a matter of "force adjustment", compared to a full-size aluminum platter. And it was pretty much gone afterwards. But that's just my uneducated lame old hands :-D Just after that, a friend of mine ("retired" Hip-Hop DJ from the 90s) played with it and put it to good use for a while, and it did not skip at all, set at 2.5 gramms, bytheway. Speaking of "whole turntable" stiffness: When I mechanically stress the platter now (placing a ~1 kg weight on the far outside), it flexes a lot less, of course, but it also bends in a different place. If I look closely, I can see the center pin's tip move a little bit. And I'm pretty sure that before it didn't. That's the curse of mechanic assemplies, You make one part stiffer/stronger, and it shows that the following part turns cannot keep up. I fear that making the PT01 stiffer, without the potential to make it stronger (because "strength" goes hand in hand with "weight", and it's a mobile device) means to walk in the wrong direction. The stiffer parts are worse in terms of transmitting vibration, resonate at higher frequencies, rumble,... In terms of "resonances", the 7" turntable is in disadvantage anyway, compared to the full-size turntable. Not only does a "stationary turntable" benefit from being able to add mass to make everything strong. They also use the available space to isolate the tonearm from turntable from motor. On the PT01, it's all just one single wobbly plastic part. I guess we all agree that "it works quite fine", and I start to believe that flex is essential to why it works. Another disadvantage is that the parts (platter, tonearm) are smaller, therefor inevitable resonate at higher frequencies. On fullsize turntables, they "hide" these resonances in the non-audible frequency spectrum. but for a 7" portable, I guess we simply cannot expect any "reasonable" sound signal below 70 or 80 Hz... Anyway, I'm making a new stiffer platter right now, just because. Here's the "lower part" on a first functional test: https://www.youtube.com/watch?v=cJvNUiiazeU I just glued to the "upper part", it'll need 12 hours to cure... r
-
Yes, it would have been easier. But it only fiddles with the sympton, not the problem cause. I just adjusted the PT01's 33 and 45 settings with the help of the Dr. Feickert record/app. 33 as well as 45 were set ~1.2 rpm low. Flutter at 33 rpm is ±1.3%, bytheway, at 45 it's ±0.8%. r
-
First post... hi, I'm from Bavaria (near Germany). I haven't owned a turntable since ages, and just recently bought a Technics SL 1200 from a friend, just to be able to listen to my old records again (mostly HipHop from the 80s/90s). For unknown reasons I stumbled upon that PT01 Scratch video on Youtube, and after reading a bit a few weeks ago. Three weeks ago, I bought one, more out of curiosity for the general concept of a portable turntable with these in/output possibilities, than to actually "go wild" at scratching. As for "just having fun", I am disappointed about quite a few things, i.e. that the "scratch button" does not affect USB-out, or that it does not allow a reasonable usage of headphones. All the inputs and outputs seem to be connected in the most stupid way. I understand very little about electronics, but as far as I have seen, electronic issues (or fader technology) are being taken care of by quite a lot of amazing people and projects, so I'll simply "keep listening" here... It surprised me a little bit to see that most people focus on, and try to improve, the PT01 "gimmicks", but very few have a deeper look at the turntable itself. After all, it's the PT01's "heart". So far, I have adressed some major aspects about the turntable that I personally disliked: The platter's "soft" feel, and the questionable needle. But first, I swapped the stock loudspeaker for a Visaton one. Visaton are famous in the German hifi community, and at only $5, this excellent speaker is a steal. It's not a "day and night" difference (after all, we are speaking about tiny 2" acting as a "fullrange"), but clearly noticeable. I had a few of those speakers left-over from other projects anyway, and with a little adapter ring, it's an easy upgrade. (Link to adapter piece: https://www.youmagine.com/designs/adapter-piece-for-numark-pt01-and-visaton-frs-5-xts) The majority of the turntable platter's "flex" bases on a weak connection from the (bronze) bearing to the flat platter surface. It's basically "a short tube connected to a round plate", without any reinforcement ribs at all. So I designed and 3D-printed a reinfocing part that I glued to the platter. The "lotus flower" design is a result of trying to "frame" and expose the existing mini-ribs so that I can put on glue from the outside, maximizing the contact area of the additional part to the platter. It worked as expected, but however didn't really satisfy me. This issue remains to be addressed... I finished building my very own tonearm yesterday. The PT01 tonearm's geometry is excellent for playback of records, especially 7" size, bytheway, but I hesitate to expose any valuable record (i.e. old 7" from the 60s) to that needle. So I took a Shure M44-7 system and adopted it to my PT01. In contrast to other PT01 tonearms I have seen, mine does not require any springs or rubber bands. Plus, it offers a few "features", like an adjustable counterweight, and an "anti-crash" device. The tonearm consits of six 3D-printed parts, where two couples were glued together. Glueing and machining required some 3D-printed tools as well, so there are quite some "hidden efforts" involved. Compared to the stock needle, the Shure is incredibly heavy, so counterbalancing with a metal weight was a real challenge. After all, I didn't want to exceed the "footprint" of the stock system (i.e. a longer counterbalance arm would ease things a lot, but then it would stick out to the side when You're playing), and still be able to use the turntable cover. Last but not least, since we are speaking about a "mobile device", I wanted my tonearm to be as lightweight as possible. This build was meant to be a "proof of concept". I wasn't concerned about the essential function (in the end, it's just a tiny sea-saw), but I was afraid about noise (i.e. the carbon composite tube acting as an "antenna" and messing with the needle signals), or audible resonances. But it works perfectly. I have read about the low volume output before, but I wanted to see that first hand before adding electronics... https://www.youtube.com/watch?v=7-xYZn0O3IU&feature=youtu.be https://www.youtube.com/watch?v=upTMMfa7--o&feature=youtu.be That's it for now, first episode of "the unattended freelance engineer and his Ultimaker". Next thing will be a new platter... r